How can we help you?

Direct Upload from Artbutler PRO to NEXT

Create works, showrooms and exhibitions in Artbutler NEXT with just one click: From Artbutler PRO version 2.19, you can export work compilations and work information from Artbutler PRO with pre-configured uploads to Artbutler NEXT.
Don’t have an account yet? Create a new Artbutler NEXT Account.

Transfer data from Artbutler PRO to NEXT

Add Artbutler NEXT account to PRO

In artbutler > Preferences > Private Preferences > Artbutler NEXT please enter your Artbutler NEXT login details and set the API-URL to: https://api.next.artbutler.com/import

Using uploads to Artbutler NEXT

From version 2.19 of Artbutler PRO, you can transfer offers and commissions directly to Artbutler NEXT as showrooms and work lists.
There are now ready-made export configurations for all areas (works, exhibitions, offers, commissions and work groups).
You only need to enter your Artbutler NEXT login details once, as described in the first paragraph.
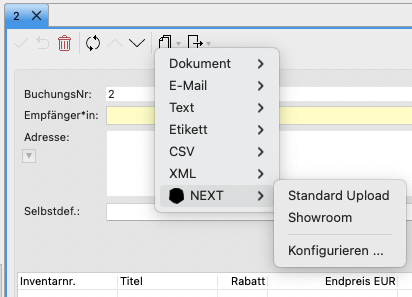
 

You can transfer single uploads of up to 600MB. For a standard upload, this is the equivalent of about 200-300 works at a time.

Customise transferred data and older programme versions

Artbutler PRO 2.18 users need to set up uploads to Artbutler NEXT once and link them to templates. If you are using Artbutler PRO 2.19, this option is optionally available for individually configured uploads.

Configure and use data transfer

Please download the templates we have provided in Data exchange with Artbutler NEXT and save them to your template directory, a designated sub-directory for them is recommended, e.g. pro2next. If you do not know where your templates are stored, please look up the path in artbutler > Preferences > Local > Templates.

Now you can set up the export to Artbutler NEXT wherever it is needed: Create an export configuration, e.g. in the work list or at a workgroup. In the following, the procedure is explained on the basis of a workgroup, but the steps are the same for an exhibition or the work list.

  • Please go to Export menu > LIGHT > Configure…
  • Click on New at the bottom left, then enter a name for the new configuration on the top, e.g. „NEXT Upload“
  • Activate the checkbox Use Artbutler Next.
  • Select the template ABNextGroupGeneric.txt you’ve downloaded in the last step with Choose, for simple work uploads from the worklist or a work record use ABNextWorkGeneric.txt instead.
  • In most cases the checkbox Overwrite existing works is the correct choice, this ensures all changes made in Artbutler PRO are transferred to Artbutler NEXT; without this checkbox existing works in Artbutler NEXT will not be updated by the import.
  • Open the Advanced Options and select the desired images: do you need only the main image or the additional images (images for docs) as well? Please choose an image size: medium or large will work well.
  • Save and you’re done!!

Now you are ready to upload work groups via Export menu > LIGHT > NEXT Upload.

Attention: When uploading, the content language in Artbutler PRO must match one of the content languages available to you in Artbutler NEXT!

After the upload, which may take some time depending on the number and size of the work images and your internet connection, you will be shown a link that will take you to a list of your imports and their respective status in your Artbutler NEXT account. The status of your current import is now also displayed here: Depending on the amount of data in your transfer, it may take a short moment for the uploaded works to be processed and the import to be completed. Afterwards, you can view your information in Artbutler NEXT and continue using it.

Create showrooms directly

To create a showroom directly from the uploaded works, you only need another export configuration for Artbutler NEXT and select the templates with the addition “as showroom” in the file name. This configuration should then also be called, for example, “NEXT Upload as showroom”. In Artbutler NEXT, you can then make further adjustments to the showroom if necessary and copy the link and the password.

If you are using an older version than Artbutler PRO 2.18 or want to provide data for an Artbutler NEXT account to which you do not have access, you can also export data as a ZIP file for a manual upload to Artbutler NEXT.

Please download the export templates provided under Data exchange with Artbutler NEXT and save them in your Artbutler template directory, preferably in a separate subdirectory, e.g. pro2next. If you do not know where your templates are stored, you can look up the path to the template directory under artbutler > Preferences > Local > Export Templates.

Now configure a TEXT export with these export templates e.g. in the worklist or at a workgroup; this configuration has to be done only once.

In the following, the procedure is explained using a workgroup, but the steps are the same for an exhibition or the work list.

  • On top of the workgroup, open the Export menu > Text > Configure…
  • In the dialogue, select New in the bottom left-hand corner and give it a name in the top right-hand corner, e.g. “NEXT Upload ZIP”.
  • Under Template, select the template ABNextGroupGeneric.txt saved in the previous step. When linking in the export menu to the worklist or to a single work record, use ABNextWorkGeneric.txt instead.
  • Select UTF-8 as the character encoding and set csv as the output format.
  • In the Advanced Options select the desired images for export: Images for documents and Size of images large.
  • Save and you are done!

Now you can export a group of works with no more than 250-300 works as a ZIP file, which can then be imported into Artbutler NEXT.

NB: Use the ABNextGroupGeneric-coreDataOnly_noPrices.txt template to transfer only the main work data (artist, title, year, technique, edition, inventory no, all dimensions, and images), e.g. to share work data with a third party.