Learn how to create consignments in ARTBUTLER as well as how to link external documents and use export templates.
1. Create consignments
As soon as you have added some artworks to your system, you can create a consignment. If you require more information to add an artwork, we’d like to refer you to our article Adding a work.
Go to Consignments in the left navigation bar.
- Click New
 in the list view top right.
 - An empty consignment entry will appear. Enter the consignment’s title.
-
Select a status: not set, planned, current, closed.
1.1. Consignor and consignee
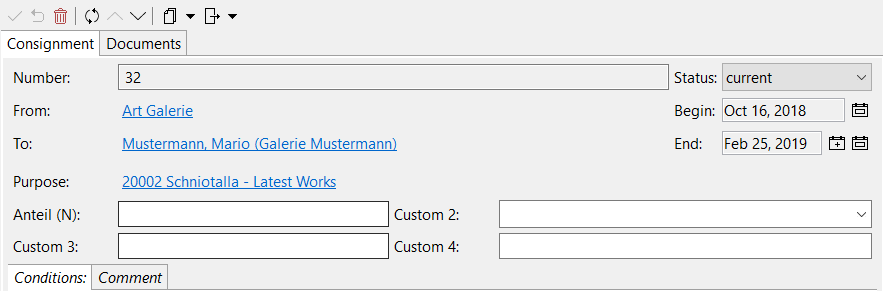
If you wish to enter consignor and consignee, their contacts must already be added to ARTBUTLER. Read our article Adding a Contact to learn how.
- As soon as you have added the relevant contacts, click on the Contacts tab in the right list view at the top.
- Click the filter button
 to open the quick filter window. You may now search for the relevant contacts.
 -
As soon as you have found the contact profiles, select them one by one and drag and drop them into the empty yellow fields next to Consignor and consignee in your consignment entry.
1.2. Starting and closing dates
- To enter a starting and closing date for your consignments, click on the starting date button
 . Select the exact date from the pop-up window and Apply.
 - To display the two dates on your scheduling overview on the starting page, click the second date button
 , neben dem Enddatum anklicken. A new pop-up window will open. If all entered dates are correct, simply select Create. Find further information in our article Using the Start Page.
1.3. Application
An exhibition may lead to a consignment. It’s wise to link consignment and the relevant exhibition in Artbutler in order to be able to retrace which consignment record belongs to which show.
To add this application, click the Exhibitions tab at the top in the right list view and select an exhibition. Drag the exhibition to your consignment and drop in the lower list.
1.4. Custom fields
Add random information to custom fields such as art handling details, return periods, or shares.
Set a title for custom fields in Artbutler’s settings. Click the Artbutler tab in the window top left and go to Preferences → User defined fields. Under User defined fields for consignments you may title individual fields for your consignments.
1.5. Works
By selecting the Works tab at the top right in list view, you may now add works.
- Select the filter button to search for artists or artworks which you’d like to add to your consignment.
-
As soon as you have found the relevant works, select the entries, drag them to your consignments and drop them in the lower list.
- You may resort the works alphabetically or in reverse alphabetical order by clicking the Inventory Number, Title, or Work Status tabs. Additionally, you may manually change the order by selecting and moving single rows. When you have completed this task, click the save button
 .
.
2. Link external documents
Please read our article Set Up and Use Document Directory to correctly link documents.
For future reference you may link documents with consignments, such as a PDF document of your consignment, transport lists, letters to your consignment partner, and suchlike.
-
In the consignment entry select the Documents tab.
- Click the New button and a pop-up window will open.
- You may title the document. Click the button Document and another window will open, allowing you to select the relevant document from your computer or network. As soon as you have chosen the right document, click Open and confirm with Create link.
-
This entry will now appear in your list. If you double click the document, it will open automatically.
3. Use export templates
As soon as you have created a consignment, you may execute different exports to export documents with specific consignment content, such as consignment contracts.
- Find out how to link templates with ARTBUTLER in our article Working with templates.
- As soon as you have created a template export, click the export button
 , go to Documents and select the desired export from the drop-down menu.
 -
ARTBUTLER will ask you where you wish to save the document. Select a storage location and click Save.
-
As soon as the export has been completed, confirm with OK. If you’d like to link the completed document to the consignment entry, you may select Link. If you’d like to open the document directly, for editing purposes for instance, select Open.
Simple create a consignment list with our Consignment template.